Be the first to know — Get Outpost's monthly newsletter for news, tips and job opportunities.
Ideas
13 Pro Tips and Tricks for Houdini
10 November 2021
We pick the brains of our talented FX, CG and 3D artists for their best Houdini tips & tricks
Neat little tips and tricks that they’ve been doing for so long, they no longer are consciously aware of doing them. This knowledge allows them to be smarter, more efficient with their workflows, which may save them in a time pinch or help them to swerve any common issues.
Often, artists build up different shortcuts over time depending on how they are using the software, however, we believe that these tricks could help even the proficient Houdini user.
Therefore, we’ve asked our finest Houdini experts for their top tips on how to get the most out of this complex software, which we’ve neatly compiled and listed below.
A massive thank you to Head of CG Joan Panis, Senior FX TDs Ole Eidsheim and Dominik Muller, FX Artist Mike Zhou, and FX Lead Chris Coupe for letting us in on their Houdini tips and tricks!
Thinking of joining our FX team? We’ve got a variety of roles available on our careers page that may be of interest to you. Take a look at our current vacancies.
1. Dynamically insert conditionals for group and object names
You can use ranges in your groups and ROPs to dynamically insert conditionals for group and object names.
For example: @name=[Pp]iece_* will grab all geometry with the "name" attribute containing both "piece" and "Piece" with everything that comes behind the underscore. In ROPs you can use this to render a limited subset of objects like myObject[0-3].
2. Make your setups as independent and modular as possible
Don't cross-reference data from one stream into another and try to avoid having one sim dependent on another. Set up a sim with source and timings that makes it look like it is. This will save you a lot of headaches down the line where an upstream change might not work well with your dependencies.
3. Utilise a model's UVs to do complex surface operations
It is often much easier to transform your model's geometry to its UVs in world space and work on it as a flat surface than on a curving polygonal shape in 3D space. For example, this can be useful if you need to have a pattern wrapped around the 3D surface: Transform the geometry to its UVs, create your pattern and use poly extrude and Boolean to have it be the same outline as the original UV island and wrap it back onto the 3D geometry using xyzdist() in VEX.
4. Visualise your geometry
You can visualise any geometry attribute by clicking on the "i" while hovering over a node and clicking on the attribute name. Adjust the attribute display type (colour, marker etc) by pressing D and going to the Visualize tab.
5. Simplify your collision geometries
Simplify the collision geometries using polyreduce or convert to VDBs then convert back to geometries. Use point deform to move the proxy collision. This usually speeds up any simulations.
6. Check your work regularly
Test render with image backgrounds to get more accurate look when composited.
7. Use Houdini scale
Work in Houdini scale such as using mocap biped1 as scale reference.
8. Lab tools can be your best friend!
That's it. That's the tip.
9. Never underestimate the power of simplicity
Before delving into wrangles, python SOPs or custom microsolvers try using existing SOPs to build out your initial network. This is easier to follow for an artist picking up the scene and much of the functionality once written in wrangles is now available in SOPs - It will save time and allow the early answering of the important questions to do with beats, timing and framing of the effect.
10. Simplicity is a good starting point for simulations
It's often easy to jump in to building complex velocity and or control fields but in practice they can often lead to simulations that both look and feel overworked. The two most important areas for simulations, especially for pyro and flip, are source and collision – spend time on both and the simulation will yield interesting results. If the simulation has motion that is feeling a little lifeless, initially try adding interesting velocities to the collision volume, this can take a lot of work out of having to add other velocity fields to the simulation and will lead to more natural organic motion.
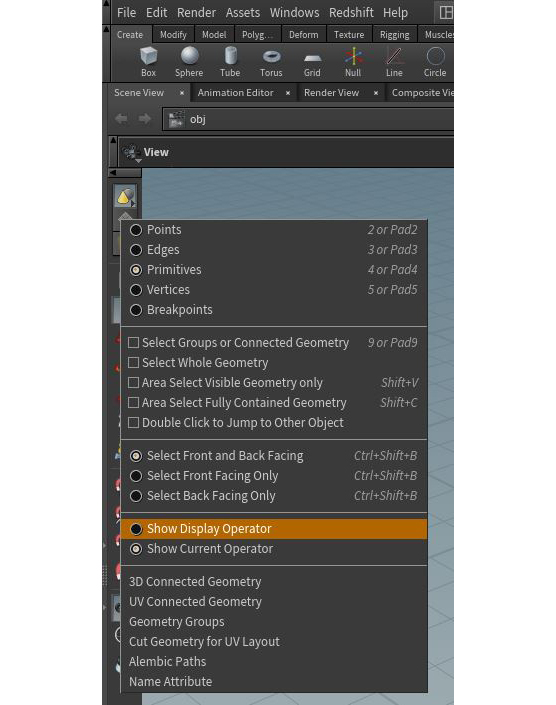
11. Use the Geometry Select Mode to disable Houdini from computing your node tree to that point
If you're working with a heavy scene and need/want to make changes to a node further up the node tree (further up from where your display flag is), it can be quite annoying that Houdini wants to compute the tree again up until the node that you selected to make changes to. To disable that, you can Right-Click on the Geometry Select Mode icon on the left and then select Show Display Operator. Just don't freak out when e.g. handles for the transform SOP don't show up anymore (when selected but not having the display flag).
12. Quickly scale pieces to unit size
A - Using the transform SOP, input the following:
In translate: -$CEX, -$CEY, -$CEZ
In scale, in all fields: 1/max(max($SIZEX,$SIZEY), $SIZEZ)
In pivot: $CEX, $CEY, $CEZ
B - Using attribwrangle: float maxsize = max( getbboxsize(0) ); @P *= 1.0 / max_size;
13. Use VDB volumes to store Volume Information
Whether you’re looking at a Pyro Simulation or a Procedural cloud setup their uses are quite versatile. However, they can get quite heavy once written to disk. Thankfully there are a few ways to drastically improve the size they take. The following actions make sure we have the lightest VDB cache possible, assuming we're working with VDB volumes. If not, we should convert Volumes to VDB.
A - Vector merge any 3-float volume primitive components together. For example: vel.x of type float, vel.y of type float, vel.z of type float should be merged into a single vector 3 vel primitive using the VDB Vector Merge SOP Node. This will not necessarily gain any space but helps keep the VDB tidy.
B - Delete unnecessary VDB primitives. For example: If you are going to render just smoke and not use a pyro shader, you could remove volume fields like temperature, fuel, etc… Basically, anything that is not needed by the shader. This is very easily done through a Delete SOP node.
C.1 - Reduce the size of the VDB by clipping the Volume Fields bound sizes to the Density field bounds. One way of doing this is to scatter a few points on the density field with a Points from Volume SOP node, then making a cube object with the Bounds SOP node. Next, feed that in the VDB clip SOP node as the secondary input.
C.2 - If the volume is huge in world space, you can even look at making the bounding box closer to the camera frustum, helping you remove as much volume as possible on a per frame basis. One way of doing that is to remove the scattered points specified in C.1 that are not in the camera view and then use those points to generate a Bounds to clip the volume.
Here's a quick snippet to cull points outside camera with an Attribute Wrangle SOP node using the toNDC VEX function:
vector ndcP = toNDC(chs("camerapath"),@P);
float frustumPadding = ch("frustumpadding");
float clippingDistance = ch("clipping_distance");
if((ndc.z > -clippingDistance) || (ndc.x < -frustumPadding) || (ndc.x > 1+frustumPadding ) || (ndc.y < -frustumPadding ) || (ndc.y > 1+frustumPadding)){
removepoint(0,@ptnum);
}
Then just select the camera in the parameters and the points outside the camera should get culled. There is also frustum padding and clipping distance control added for good measure in this snippet. (Make sure to hit the little create spare parameter icon to auto-generate them).
D - If you have many fields in our VDB Volume then an incredibly powerful step that can only be done with VDBs is to deactivate voxels of the other fields based on the main field (usually density). This will drastically improve our VDB Volume size.
You can deactivate voxels in other fields by hand by splitting the VDB primitives out first. Then combining each one of them with the main field (density in most cases) with a VDB Combine SOP node and setting the mode to Activity Intersection.
Finally, you can merge all the fields back together into 1 multi VDB Field object that should have had their voxels deactivated where there isn't any density.
E - Another powerful way to reduce volume size on Multi Field VDBs is to resample secondary, less precise fields.
For example: If we are using Vel for motion blur purposes, then it doesn't have to be very precise. We can easily resample the field with a VDB Resample SOP node and scale the voxel to at least twice its size.
The same goes for other secondary fields like Rest and Rest2 etc… Obviously, only do this on fields that aren't primary fields for the render. Test the shading as you resample fields to make sure you aren't losing visual quality.
F – Finally, you can switch the VDB float data type from 32bit float to 16bit float.
As volumes are in essence blurry, you will not see much of a difference at render time. This can help reduce even further the size/memory used.
This can be achieved with a Primitive node by setting the volume > VDB > write 16 bits float checkbox.
With that in Mind we can easily shave a TON of space this way we can easily gain over 10 times + the disk space following these little steps!